Creating a no or low content book business is a great way to make a passive income as a busy mom. You can design the interior and exterior of books like journals, notebooks, planners, diaries, and log books and then set them up on Kindle Direct Publishing for printing when purchases are made on Amazon.com.
It’s a great way to become a part of the Amazon marketplace at no cost to you. You design and upload your book and description all for free. Then when someone purchases your book, Amazon prints the book and fulfills the order and you make the profit.
This time of year, a popular item to create is an annual planner. This is the time of year that many people are looking for a planner for the coming year either for themselves or as a gift to a loved one. You can design your own planner and list it for sale on Amazon.

Tools
My favorite no cost tools to create a planner are PowerPoint and Canva. I use PowerPoint to create the grid for the monthly planning pages. I then save those grids as images that I can insert into Canva which is where I design my pages and cover.
You can also use a variety of other programs like Affinity Designer, Microsoft Sway, Adobe Photoshop, and Adobe Illustrator. However, Canva and PowerPoint are the two I am most familiar with and they are both free.
The Month Grid Layout
So I use PowerPoint to create any grids I want to use. The most common would be the month spread across two pages. But, you might want to also have a year at a glance grid or a weekly layout grid.
The first thing I do is change the dimensions of my slide to the dimensions of the book I want to make. I want to be able to see how the grid I make will fit on the page. Many planner are either 6” x 9” or 8” x 10”. But you can make your planner any size you like.
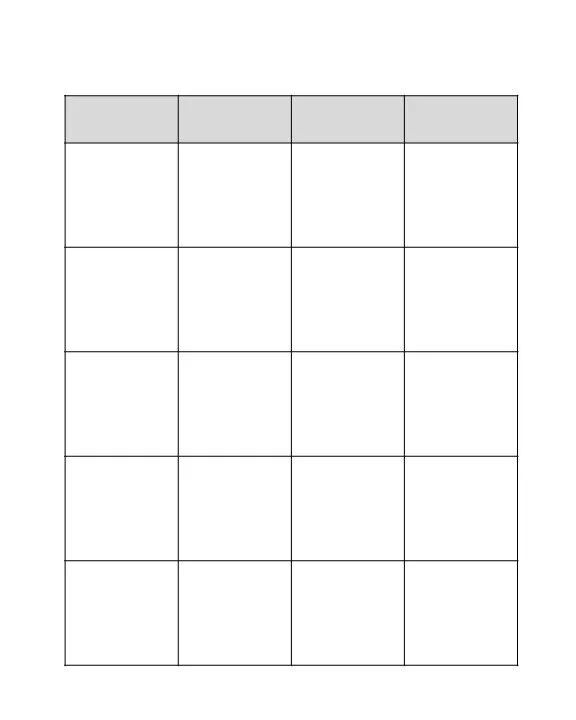
Then I insert a table to be my grid. For a month spread, my first grid on my first slide will be 4 columns and 6 rows. The top row for the days of the week, I make shorter than the other boxes. I can then change the color of the grid lines and the fill color for the boxes.
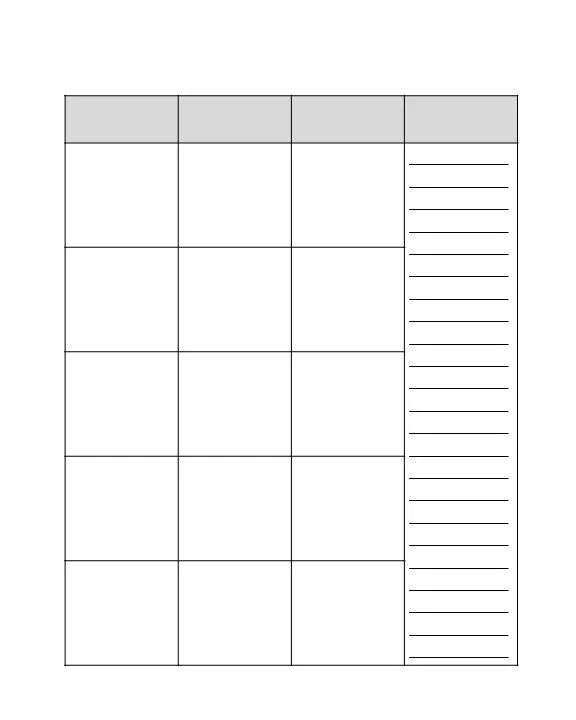
Once I get the grid laid out just how I want it, I then copy the slide so I can modify it for the other half of the month layout. I usually keep everything the same except the last column of boxes. The top cell stays intact, put I merge the boxes below it and fill it with lines. I use this as a notes section for my monthly layout.
I then save the slides as images that I can upload into Canva to create my planner. Check out an example of the grids below.
Planner Design
Once I have any grids I might need created, I head over to Canva to design my planner. First I create a project the size of my planner. Then I start with my planning pages. Typically this would be a month view and then several weekly layouts.
Canva does have a maximum of 100 pages which you can have in one project. But don’t worry. Just make enough planning pages for the first 6 months in one project and then make a copy of that project to make the remaining pages.
You can easily copy and move pages in Canva, so you can create one perfect monthly layout or weekly layout and then copy it over and over again.
Once you complete the planning pages for the full year, you can add any additional pages to the front and back of the book. You might want to include planning pages or budgeting pages or notes pages. You should have enough pages in either project to add pages on either end of the book.
When adding pages to the front of the book, make sure that you always have an odd number of pages before the start of any 2 page spread. You want to make sure your spreads actually show up correctly and not on the back and front of a single page.
Once your whole interior is designed, you can download the two files as PDFs and then merge them using PDF Merge or PDF Escape or a variety of other programs or websites.

Cover
Lat you need to design the cover of your planner. This again can be done in Canva. In order to figure out the size of the cover you can go to the KDP Cover Generator. There you can input the size and number of pages of your book and it will generate a template for your cover.
You can upload the image file to Canva and use it as a template when you create your cover. First you create your design based on the template dimensions. Then you can inset the template into your design and make it transparent to you can see how everything is laid out.
Once you have your cover perfect, you download this file as a PDF as well. Once you have your two files, you head on over to Kindle Direct Publishing to upload your book and description.
KDP will review the book to make sure the layouts are correct and nothing is too close to the edge of the page. Once they give your design the OK, you will have a planner for sale on Amazon. You can create a variety of covers for the same interior or modify the interior to create a whole collection of planners.
Now is the time for planner sales, so get designing! Have questions? Just leave me a comment.
Cheers,
Emily